CLICK HERE FOR FREE BLOGGER TEMPLATES, LINK BUTTONS AND MORE! »

Monday, April 11, 2011

Aaron’s 6th Mad Scientist Birthday Party

      Our friends Karen and Mike put their heart and soul into this AWESOME mad scientist birthday party for their son Aaron.   My Savannah had a blast!  (No pun intended.)

science lab sign

   This is the sign decorating the front entrance, and I guess it helps when you’re related to a professional illustrator.  (If you’ve ever visited the Pentagon in DC, you’ve probably seen his work.) 

The festivities kicked off with each child receiving his/her own personalized lab coat. 
lab coats

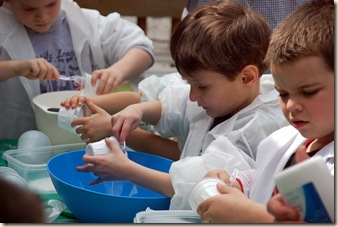
It wouldn’t be a mad scientist party without some homemade flubber- many of them just called it goo or slime, or in one little girl’s case, making brownies, because she used every color of food coloring.   Ech!

You (birthday boy) start with 1/2 cup of Elmer’s glue
flubber- glue

And add water, then food coloring, and finally borox to get it really gooey.  I forget the exact measurements, but the recipe is easily googled.

This is where the kids had to abandon their spoons and get messy.  Squeezing out the extra water is important.
getting messy

And the end result is some fabulous albeit messy flubber!  I don’t envy the dishes Karen had to do after this one.
flubber

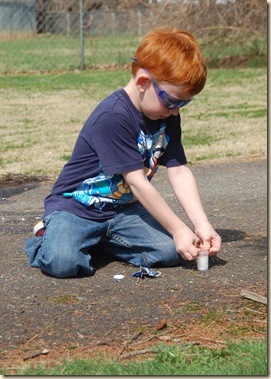
The next fun experiment was alka seltzer rockets!  Woot!  The kids used what looked like 35mm film canisters, but they were white plastic and the lids didn’t go on quite as tight.  I’m guessing that’s key. 

Basically, you fill it just less than halfway with water, drop in half or a whole tablet of alka seltzer, replace the lid,
alka seltzer rockets

stand it on the ground- lid down, and get out of the way.
rocket safety

This all has to be done pretty quickly because you only have about 2-8 seconds before….LIFT OFF! 
DIY rockets

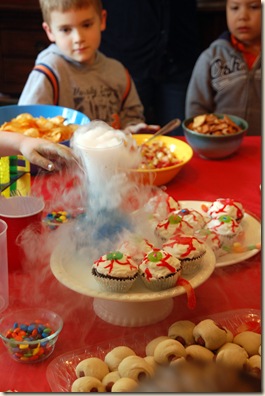
By then the kids were ready for snacks, and oh my!  Check out this party table!

mad science birthday party

Eyeball cupcakes, beakers full of who knows what, worms, drinking cups that are actually beakers with eyeballs in the bottom, and where the HECK do you get dry ice?
mad scientist party

All the kids wanted to touch the “smoke” from the dry ice, obviously.  I highly recommend the strawberry/apple/banana/sugar and cinnamon salsa with cinnamon pita chips.  Mmm-hmm!

And just when we thought the party was over, there’s more!  Homemade lava lamps!

alka seltzer in oil

We all saw what the alka seltzer did in water, but would it bubble in vegetable oil?  Good question…

This was another easy experiment that still guaranteed to blow your mind.  Fill an empty water bottle 3/4 full with vegetable oil.  Top it off with water.  Drop in 10 drops of your favorite color food coloring, and add an alka seltzer.  Voila!  Insta-hippie!

homemade lava lamps
This party is definitely going down as one of my favorites.  Good job, Karen and Mike!

 science birthday party

Life’s Delights “Recycled” Owl Clock

DIY clock
     This refurbished clock may look familiar.  I posted it along with the rest of my daughter’s new owl and nature themed bedroom a while back.  I picked out just this photo to participate in Heart2Heart’s “Reuse/Recycle” challenge. 
     Yard sales are the best places to find items to alter.  The clock originally had that creepy 1970s wood paneling color going on, so I painted it, worked some paper/stamping/Cricut magic, and BAM!  You’d never know it’s something I paid a whole dollar for!  : )

Materials: 
CTMH “Whooo Loves You?” stamp set
CTMH Life’s Delights paper pack
Cricut- Alphalicious cartridge

Saturday, April 9, 2011

Splendor “Happy For You” Card


Splendor card

     As you know, I usually don’t make or blog about cards, but there were several challenges I wanted to jump in this week.  Mojo Monday provided the sketch, Heart2Heart gave us the “April showers bring May flowers” theme, and the Play Date Cafe chose the colors.  Coincidentally enough, Close to My Heart makes a paper pack with lots of flowers based on the blues and greens- moonstruck, sky blue, and topiary.  So this card was actually pretty easy to put together, not a lot of thought required.  I did have to squirm just a little when I decided my handwriting is (still) crap, and I had to cover it with the bracket thingy at the top.  Is there a name for the shape that looks like a rectangle, but each side is a bracket?

    Two nights ago, a CTMH sister and flower guru, Michele Auten, taught us how to make these 3-D flowers at our team get-together.  Of course, now I have to put them on everything.  The fleece flower pillows had a good run, we’re set for a couple birthday parties, and now I’m back to paper flowers.  I just might have to tackle the flower box on Michele’s blog. 

Thank God for spring!  (And that fact that I’m not prone to allergies.) 

Tuesday, April 5, 2011

Fleece Flower Petal Pillow


If we’re friends on Facebook, you might have seen that I recently incurred a craft-related injury.  Guess what?  Hot glue is…HOT!  When my 3 year-old almost tripped over the cord taking the gun (and my project) with her, I did a little dance to try to save everything at once and failed.  My blisters are healing great, though- means to an end.  And it was all for these
FLEECE FLOWER PETAL PILLOWS
DSC_1540

You can use felt too if you like, but fleece is much softer and on sale right now at most fabric stores.   I got the idea from Come Together Kids blog- check it out.  That chick is awesome!  She also has complete instructions are completing your own flower pillows.  She did monochromatic pillows like the pink on on the left.  Switching up the colors and adding ribbon petals was all me.  (I have to add at least a little flair!)

DSC_1541

Hopefully, my sister will be proud because I actually sewed just on the leaves and the back (the rest is hot glue).  It was stressful, and I spent more time correcting mistakes than real sewing, but again, the product is worth it.  And this purple and pink beauty is a birthday present for her daughter’s 6th birthday.  Lexi is pumped about churning them out as birthday party presents.  I like that it’s cheap and something we can do together.  If you have a girl, chances are one is coming your way.  : )

Friday, April 1, 2011

Star Wars Face Paint Gig


I was absurdly excited to do a little BOY gig finally for a friend’s son’s birthday party.  It was almost two themes in one: legos AND Star Wars (Clone Wars to be more specific).  But once I got going with the Star Wars painting, the legos images I brought seemed weak.  I did have to do a couple puppy dog faces for the little sister and friend, but I’m hooked on full storm trooper faces now.  Anyone want to let me practice??


This double light saber was straight on his arm when it was pointing toward me…but…

P3180077

Apparently, I only got shots of the two Darth Maul kids I did.  Hoping my friend sends me more pics…

P3190078

Madeline let me practice on her before I left…

P3180064

P3180065


I’m still waiting to do a pirate party at some point.  That would be cool, but my kids aren’t biting.  Looks like this year is going to be luau, rainbow, and Donkey Kong themes.  (Donkey Kong has potential…)


Enjoy!

: )

Monday, March 28, 2011

Jello Play Dough Recipe


My three favorite days of the year are the Town Wide Tag Sale in Oct. and the spring and fall MOPS consignment sales I work.  This weekend was the MOPS sale, and I brought home two “new” play-doh kits (and was surprised to learn that there were two we didn’t have.)  To celebrate, we decided to make a batch of homemade play dough.  We usually like the kool-aid variety, especially grape because it makes purple and smells heavenly.  Unfortunately, kool-aid isn’t something we normally keep in the house and this was an impulse thing.  We DO however have a veritable plethora of jello! 

jello play dough
Here is the recipe from www.easyfunschool.com

Jello Playdough

Wondering what to do with all of that jello you bought on sale but never seem to have the time to make into something? Here's a really cute recipe for using it to make scented playdough. The kids love it!


Ingredients:
1 cup white flour
1/2 cup salt
2 T. cream of tartar
2 T. Vegetable oil
1 c. warm water
1 three oz. pkg. jello (any flavor)

Directions:
Combine ingredients and cook over medium heat until it thickens and pulls away from the sides of pot and becomes dull. * Note: it burns easily so don't put over too high a heat and keep stirring. Mold and knead until cool enough to touch. Store in a closed plastic bag.

Funny side story:  So, I only had about one tablespoon of cream of tartar (recipe calls for two), and we live 20 min. from the closest grocery store.  Luckily, my in-laws live next door.  My MIL is probably the most resourceful person I know, for her habit of saving EVERYTHING if nothing else.  She kept all my husband’s toys that my kids now enjoy.  So I didn’t think cream of tartar would be an issue.

Sure enough, this is what my FIL brought over.
DSC_1523

I thought, ‘How trendy!  Look at that cute retro design.’  And then, ‘Wait a minute!  This IS my MIL we’re talking about.’  I turned the container upside down and BAM!

DSC_1521

Yes, you are reading that correctly.  This cream of tartar “expired” in Sept. of 1977, which means it was manufactured before that.  This little container is older than the hubs and me.  HA!  I don’t think cream of tartar ever really expires anyway.  At least I didn’t feel nervous about using it in a play dough recipe.  And while I’m usually one for taste exploration, the next pic was only of slight concern. 

DSC_1527
Sorry, kids!  This time we’re not eating the play dough…

Friday, March 25, 2011

CM Spring Display


spring display

One of my most favorite all-time crafty purchases is this display I bought from Creative Memories.  It’s large enough to generously display any single page layout as well as magnets that could take the fillings out of your teeth.  Nothing’s falling off this board!  And if you don’t want to take the magnet route, hang your treasures with the cute little clothes pins.  I just love it!
The #1 benefit, though, is that it allows my pages to get a little more face time.  No matter the season, I go to my albums and pull out a favorite to display for the season.  This one happens to be from 3 years ago, but now the family gets to enjoy it again for a couple months.  I had almost forgotten about that sweet photo of Savannah with a caterpillar on her finger wearing a tutu.  The fake grass is a bit much I think, but it does grab one’s attention, eh?

Happy Spring, ya’ll!!

: )